Table of Contents
Main window – GTK+ version
This article describes the main window in the GTK+ graphical user interface, which may be preferred by Linux or BSD users using the GNOME, Xfce or LXDE desktop environments. Microsoft(nbsp)Windows users should see the Qt version, which is the default GUI for the official Microsoft Windows builds of Avidemux.
Main toolbar
The main toolbar allows easy access to the commonly used actions:
 Open a video file(nbsp)(ndash) clicking the little arrow button pops up a dropdown menu with recent files
 Display file information (audio/video format, resolution etc.)
 Open a bitrate/filesize calculator(nbsp)(ndash) it calculates the video size for 2-pass encoding (because only video size, without audio, is required in the 2-pass encoder settings), clicking the Apply button sets the 2-pass video size for the selected encoder
- Input(nbsp)(ndash) display input (unfiltered) video in the main window
- Output(nbsp)(ndash) display filtered output in the main window
- Side(nbsp)(ndash) display both input and output in the main window, horizontally
- Top(nbsp)(ndash) display input and output stacked vertically
- Separate(nbsp)(ndash) display input in the main window and output in a separate window
Navigation bar
The navigation bar is used for navigation, using the navigation slider on the left and the buttons, playback, selecting parts of the file (cutting) and time information.
Navigation
 Go to previous intra frame (keyframe)
 Go to previous black frame(nbsp)(ndash) searching for black frames may take some time and may not be 100% accurate
 Go to the first frame (beginning)
 Jog/shuttle, fast-forward or rewind by turning the wheel, speed depends on how far it is turned; keyframe based navigation
Selection
You can either cut or save a selected part of the video.
 Set mark A (selection start) to the current frame
 Set mark B (selection end) to the current frame
 Shows the position of mark A, the selection start
 Shows the position of mark B, the selection end
 This frame shows the corresponding frame numbers for A and B marks (unless you set A or B marks, the whole video is selected), pressing the “A:” or “B:” button means “go to mark A” or “go to mark B”
Information
 Displays current frame and total number of frames(nbsp)(ndash) when you enter a frame number into the current frame text box and press Enter, Avidemux will go to that frame
 Displays current time and total time
 Type of the current frame (I-frame, P-frame or B-frame), the number between brackets shows the quantizer used to encode the displayed image (meaningful only when used with a quantizer type codec like the MPEG codecs)
Audio/video sidebar
The toolbar on the left can be used for setting audio and video encoders, filters and the output format.
Audio and video encoders are listed in a “format (encoder)” form, where format is the specification, standard, while encoder is the particular software library, implementation, that encodes the stream to the chosen format. For example, “MPEG-4(nbsp)ASP(nbsp)(Xvid4)” means the output video format is set to MPEG-4(nbsp)ASP and the chosen software library used for encoding the MPEG-4(nbsp)ASP video is Xvid. “MP3 (LAME)” means the output audio format is set to MP3 and LAME is the MP3 encoder.
The “Format” menu is mainly used for setting the output container. A container contains audio and video streams multiplexed into a single file. It is important to select a suitable container format for the audio and video stream types selected in the Audio and Video menus. For example, MPEG-2 (DVD, SVCD) or MPEG-1 (VCD) video should not be saved into an AVI container. Some popular A/V format/container combinations include:
- video: MPEG-1, audio: MP2, container: MPEG-PS (suitable for a VCD, universally playable on most computers and operating systems including Microsoft Windows, without installing additional codecs)
- video: MPEG-2, audio: MP2/AC3, container: MPEG-PS (suitable for DVDs)
- video: MPEG-4 ASP, audio: MP3, container: AVI (a very popular format, playable on standalone “DivX compatible” players, in software players like MPlayer, VLC or xine and in Windows-based players if an MPEG-4(nbsp)ASP decoder such as DivX, Xvid or ffdshow is installed)
- video: H.264 (MPEG-4 AVC), audio: AAC, container: MP4 (the MPEG-4 standard)
- video: H.264 (MPEG-4 AVC), audio: Vorbis, container: Matroska (an efficient free software choice for playback on computers, players like MPlayer or VLC can play the files out-of-the-box, for playback in Windows Media Player, an H.264 decoder such as ffdshow and a Matroska splitter such as Haali Media Splitter is needed)
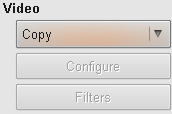
 The default video encoder is “Copy”, which means no video encoding, video from the input will be copied to output (filters cannot be applied in Copy mode)(nbsp)(ndash) selecting a video encoder from the drop-down list allows you to configure it (the Configure button) and set video filters (the Filters button); if a supported encoder does not appear in the list, it means Avidemux has not been built with support for it
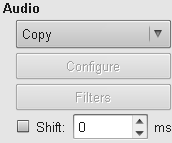
 The default audio encoder is “Copy”, which means no audio encoding, audio from the input will be copied to output(nbsp)(ndash) selecting an audio encoder from the drop-down list allows you to configure it (the Configure button) and set audio filters (the Filters button); when the the A/V shift checkbox is checked, audio will by shifted by number of milliseconds set in the A/V shift spin box


