User Tools
Sidebar
Table of Contents
Create video from still image and from audio file
This page tries to explain how to create video file from still image(s) and from audio file. You can then share these files to your friends (or even upload them to YouTube).
There are two methods with AVIdemux to make these kind of videos, first is AVIdemux only and second is AVIsynth+AVIdemux.
AVIdemux only method is faster and easier if you only use one image.
AVIsynth+AVIdemux is little harder, but makes adding multiple images easier.
AVIdemux only
Basic plan is quite easy, open single image file, copy+paste it few times, add audio and save the result (encode audio+video if needed). Unfortunately certain AVIdemux versions have issues with frame duplication that might crash AVIdemux sometimes. Other issues is related to MP3 audio files, which AVIdemux might ignore.
In nutshell:
- Open image file via File → Open…
- Use Edit → Copy, then use Edit → Paste (use Ctrl+v / ⌘v) to replicate the still image
- Add audio via Audio → Main Track…
- Set video and audio encoder (if needed), select output format then use File → Save → Save video…
Part 1. Open image
This is the easiest step. Just use File → Open… and select the .png or .jpg file you want to use.

AVIdemux should show the image in the editor now. Unfortunately AVIdemux doesn't open all image files nor show them correctly, if this happens, then use some image editor and change format of image (e.g. .jpg → .png) and try again.

You can resize/crop the image later, but it is easier to resize/crop the image in image editor tool before you add it to AVIdemux.
Part 2. Copy+paste
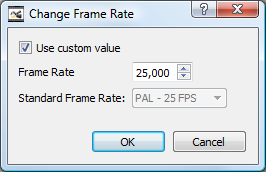
Now part that requires some math. Don't worry, calculations are quite easy. You have to use Copy+paste+paste+paste… (use Ctrl+v / ⌘v for paste, Hold it down) until you have enough frames. Enough frames in this case means length of audio in seconds multiplied by FPS. Default FPS is 25, you can change FPS value from Video → Frame Rate…

So if your audio track is 3 minutes and 24 seconds, and the FPS is 25, then you need (3*60+24)*25 = 204*25 = 5100 frames. You don't need exactly that many frames, but some video players will only play video for the duration of video track, so if you want the whole audio to be played, then have at least that many frames.
Instead of Copy+paste+paste, you can use Copy+Paste, then set A selection to 0 and B selection to last frame, then Copy+Paste and repeat.


IF YOU GET CRASH AT THIS STEP, then try AVIsynth method, or just save small working parts to video (like 40 frames), and join them together with File → Append…
Part 3. Import audio file
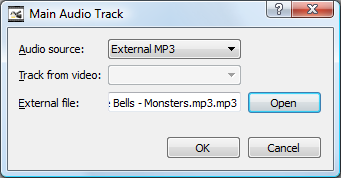
You can import AC3, MP3 and WAV audio tracks to your video. You can add the audio via Audio → Main Track…, then from Audio source select External AC3/MP3/WAV according to the audio track, and select the audio file via External file.

If you have imported MP3 audio, but it isn't included, then try to process the audio file with MP3packer or with similar tool (Audacity also works if you e.g. turn the MP3 audio file to WAV).
Part 4. Set encoders, and save file
Now your video is ready for saving. Choosing video and audio encoders isn't easy for many people, so below are some preselected choices that will work
- Video: MPEG-4 AVC (x264), Audio: AAC (Faac), Format: MP4
- Video: MPEG-4 ASP (Xvid), Audio: MP3 (lame), Format: AVI
You can leave the audio part to Copy (with MP3 audio file), that way you avoid unneeded encoding step which will save some time and keep the audio quality.
(you can apply filters at this point if you need them via Video → Filters or Audio → Filters)
Saving the video happens via File → Save → Save video… (remember to give file extension, e.g. if you selected Format: MP4, then add .mp4 to filename)

File sizes should be quite small, since still images turned into video can be compressed very efficiently with most video encoders.
AVIsynth+AVIdemux
This method is little harder, since you have to write stuff and install AVIsynth in case you don't have that already installed. Basic plan is quite simple, open AVSproxy GUI, select AVIsynth input, write few lines of script, create proxy and save the video.
In nutshell:
- Open AVIsynth Proxy GUI that is in your AVIdemux install folder
- Use Custom tab and insert few lines of script
- Start the proxy which starts the AVIdemux
- Set video and audio encoder (if needed), select output format then use File → Save → Save video…
Part 1. Open AVSproxy
Part 2. Create AVIsynth script
This is the hardest part of the operation. Fortunately you don't have to study AVIsynth scripting, since the code sections give below will work for most scenarios and hopefully you will notice the patterns that you can use if you want to do some modifications.
If you want one image and audio track for that, you use ImageSource + DirectShowSource + AudioDub.
For Imagesource you define the image file (inside “”), and how many frames you want (end=), and the FPS (fps=). For DirectShowSource you set the audio file name, and force it to audio only mode. AudioDub just joins (muxes) the video and the audio together.
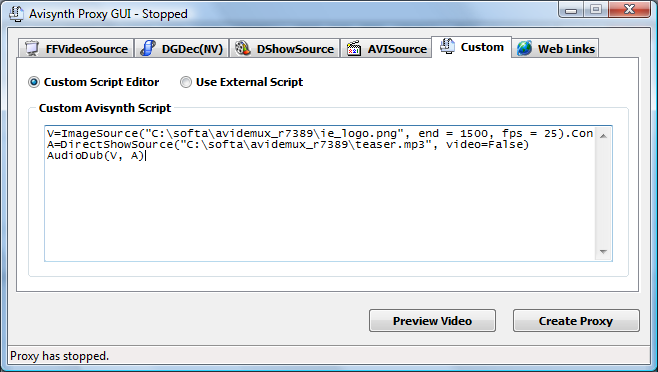
For example, following script would use ie_logo.png as still image input (1500/25=60 so duration is 60 seconds), and teaser.mp3 for audio
V=ImageSource("C:\softa\avidemux_r7389\ie_logo.png", end = 1500, fps = 25).ConvertToYV12()
A=DirectShowSource("C:\softa\avidemux_r7389\teaser.mp3", video=False)
AudioDub(V, A)
Part 3. Start AVIdemux via proxy
Another easy part, just click Create proxy button.

After this, the AVIdemux should open up, and show the image. When you press play, you should also hear the sound.

Part 4. Set encoders, and save file
Now your video is ready for saving . Choosing video and audio encoders isn't easy for many people, so below are some preselected choices that will work
- Video: MPEG-4 AVC (x264), Audio: AAC (Faac), Format: MP4
- Video: MPEG-4 ASP (Xvid), Audio: MP3 (lame), Format: AVI
You shouldn't leave the audio or the video part to Copy since AVIsynth passes forward only uncompressed audio and video (output file size will be huge with uncompressed raw video).
(you can apply filters at this point if you need them via Video → Filters or Audio → Filters)
Saving the video happens via File → Save → Save video… (remember to give file extension, e.g. if you selected Format: MP4, then add .mp4 to filename)

File sizes should be quite small, since still images turned into video can be compressed very efficiently with most video encoders.


